How to build your own survival neck lace
Your Ultimate Wearable Survival Kit
If you’re passionate about outdoor adventures, prepping, or just love being ready for anything, today’s post is for you.
We’re diving into the Arctic Survival Necklace.
A compact, wearable survival kit inspired by cold-weather survival experts like Joshua Enyart of Gray Bearded Green Beret.
This necklace keeps essential tools close, warm, and accessible, even in the harshest conditions.
I’ll explain what it is, what goes on it, how to make one, and share Amazon links to build your own.
Let’s get started!
ON SURVIVAL is a reader-supported publication. To receive new posts and support my work, consider becoming a free or paid subscriber.
What Is an Arctic Survival Necklace?
The Arctic Survival Necklace is a minimalist survival kit you wear around your neck, designed to keep critical tools at the ready in cold, unforgiving environments.
Its core idea, popularized by survivalists, is to carry a lighter, flint, chapstick, and paracord, whistle and other items that stay functional by being warmed against your body.
The necklace ensures you have fire-starting and cordage capabilities even if you’re separated from your main gear, like during a winter hike or emergency scenario.

Why wear it?
It’s lightweight, discreet, and keeps essentials accessible without rummaging through frozen pockets or a pack.
Plus, it’s customizable to fit your needs, whether you’re in the Arctic tundra or a milder climate.
Safety note: Always use a breakaway clasp to prevent snagging or strangulation risks, especially in dynamic activities like climbing or water sports.
Why Build an Survival Necklace?
Immediate Access. Tools stay warm and ready, even in subzero temps.
It's ultra-Compact. Less bulky than a survival tin or belt pouch.
You can customize it. Add tools specific to your environment or skills.
It's a backup plan. A lifesaver if you lose your pack or get stranded.
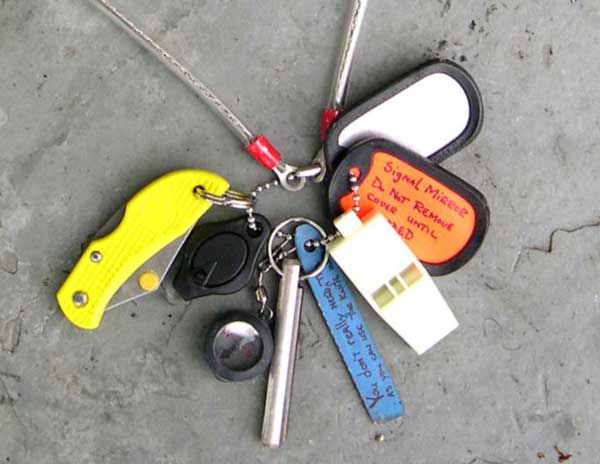
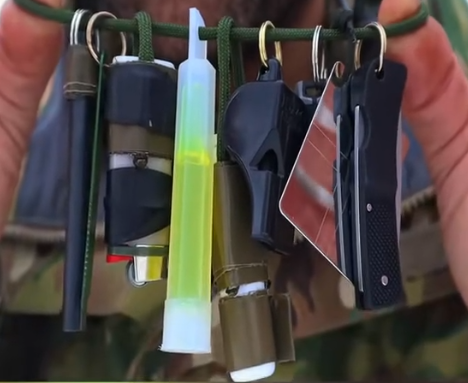
What’s on an Survival Necklace?
The traditional Arctic Necklace is simple but effective.
You can expand it with extras for more versatility and based on your local environment.
Here’s the breakdown:
Core Components
Lighter: A reliable fire source, kept warm to work in freezing conditions.
Chapstick: Prevents chapped lips and doubles as a fire-starting aid (petroleum-based versions burn well).
Paracord: The necklace itself, providing strong cordage for shelters, repairs, or improvised tools.
Optional Add-Ons
Small Neck Knife: For cutting, carving, or processing materials (always use a secure sheath).
Ferro Rod: A backup fire-starter for wet or windy conditions.
Whistle: For signaling help in emergencies.
Fire Tinder (e.g., Fire Plug or Ranger Bands): Compact, flammable material for quick fires.
Micro Compass: For navigation if you’re lost.
Fishing Kit: Small hooks and line for emergency food sourcing.
Mini LED Light: For illumination in low-light scenarios.
Avoid heavy or sharp items without proper sheathing.
Use a breakaway clasp, and if snagging is a concern (e.g., water sports), store the necklace in a pocket or tethered to gear instead of wearing it.
How to Make Your Own Arctic Survival Necklace
Crafting your own Arctic Survival Necklace is easy, affordable, and fun.
Here’s a step-by-step guide to build a basic version with room to customize.
Materials Needed
550 Paracord (10-12 feet): Durable and versatile, choose high-visibility colors like orange for easy spotting.
Breakaway Clasp: Critical for safety to prevent choking hazards.
Bic Mini Lighter: Small, reliable, and widely available.
Chapstick: Petroleum-based (e.g., Burt’s Bees or generic) for dual use.
Optional Tools: Neck knife (e.g., Esee CR2.5), ferro rod, whistle, fire plug tinder, or micro compass.
Tools: Scissors, lighter (to seal paracord ends), and optional needle-nose pliers for clasp attachment.
Step-by-Step Instructions
Cut Paracord
Measure two 6-foot lengths of paracord for a ~21-inch necklace (calculate: desired length x 3.14 = total paracord). For kids, use shorter lengths and ensure a breakaway clasp.
Seal the ends with a lighter to prevent fraying.
Attach Breakaway Clasp
Thread both paracord sections through one side of the breakaway clasp until halfway through.
Form an “X” with the cords to create four strands for braiding.
Braid the Necklace:
Use a four-strand braid for a sturdy, flat design. Cross the bottom strand over the top strand repeatedly, keeping it tight. (Two colors help track the pattern.)
Braid to your desired length, leaving enough cord to attach the other clasp end.
Add Survival Tools
Thread the lighter and chapstick onto the paracord before braiding the second half, or attach them to a split ring woven into the braid.
Secure optional items (e.g., knife in a sheath, ferro rod, whistle) with split rings or knots like a lanyard knot. Ensure sharp items are safely sheathed.
Complete the Necklace
Thread loose ends through the other half of the breakaway clasp.
Tie secure knots (e.g., square or overhand) and burn the ends to seal.
Test the breakaway clasp to ensure it releases easily.
Test and Customize
Wear the necklace to check comfort and tool accessibility. Adjust braid tightness or add/remove items as needed.
Example: Add a fire plug for reliable fire-starting or a micro compass for navigation.
Tips for Using Your Arctic Survival Necklace
Use a breakaway clasp, especially for active pursuits. If snagging is a risk, store the necklace in a pocket or tether it to your gear.
Test your tools (e.g., ferro rod, knife) in a controlled setting to build confidence.
Tailor to Your Environment
Emphasize fire-starting for cold climates or add fishing gear for wilderness settings.
Regular Checks: Inspect paracord and clasp for wear, especially after rugged use.
Why It’s a an essential tool
The Arctic Survival Necklace is a brilliant blend of simplicity and preparedness.
It ensures you have fire, cordage, and optional tools ready in seconds, all while staying lightweight and warm against your body.
Building your own lets you personalize it for your adventures, from winter camping to backcountry hiking.
Plus, it’s a fun project that boosts your survival skills and confidence.
Ready to Craft Yours?
Use the Amazon links above to gather your materials and build your Arctic Survival Necklace today.
Have a favorite survival tool or a twist on this design?
Reply to this newsletter or leave a comment, I’d love to hear your thoughts!
If you found this guide helpful, share it with your adventure buddies and subscribe for more practical survival tips and DIY projects.
Stay ready, stay safe, and happy exploring!
ON SURVIVAL is a reader-supported publication. To receive new posts and support my work, consider becoming a free or paid subscriber.
Comments ()